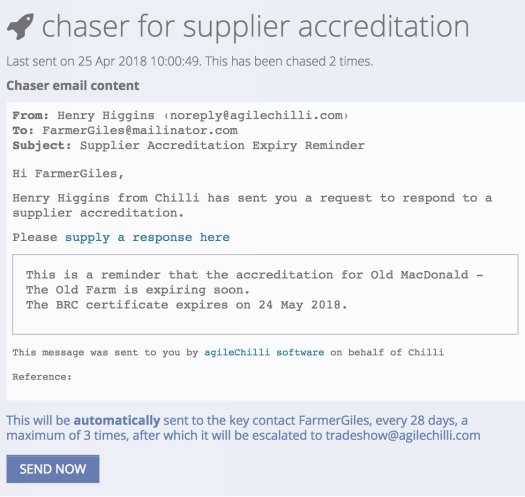
Send a Chaser email
The Chaser email facility is often used to remind people to send information. This facility is a dedicated tool, optimised to this purpose.
In a nutshell, the system comprises three parts
-
checking when something’s due and emailing the person who needs to supply it
-
allowing the recipient to easily provide the data by following a link in the email to an online form. Documents can be uploaded and other information filled in
-
if no response is received, re-sending a number of times, finally escalating to someone else (usually someone internal)
Example
The system can be applied whenever you need a third party to supply you with information or documents of a known type.
For example, a food manufacturer who receives ingredients from suppliers may occasionally need to raise a non-conformance where something isn’t up to standard.
Whenever a non-conformance is raised against a supplier, whether as a result of an audit or ad hoc, the supplier can be chased for information about a resolution of the issue. Likewise, staff can be chased if an internal non-conformance is not resolved.
Setup
As an Agilebase administrator, if you want to set up your own chaser, here’s how to do so.
-
Create a view with a list of people to chase. When editing the view, open the workflow - send emails panel. email chaser should be selected by default
-
Tick ’enable this chaser'
The system will add a number of calculations to the view and a couple of fields to the underlying table, to help manage chasing. These will be listed on the screen after ticking ’enable this chaser'.
Please edit the calculations to fill in the details required, such as the email address to send messages to, the frequency with which to send messages etc.
- Now make sure that only things you want to chase are chased, by adding any relevant filters to the view. e.g. to show anything out of date
That will be enough to get emails sending out. What about receiving the information back?
- Simply add any fields you want the recipient to supply to the view, from the parent table. The system will automatically create a form containing these fields (excluding any of the chaser fields above such as ‘to’ and ‘subject’). When the recipient receives an email, it will have a link in it that takes them to this form.
If you want the content that the chaser sends out to be visible to users, add the chaser view into a form as a referenced data field. The panel displayed to users will show information such as the email to be sent, how many times the record’s been chased, when the last time was etc. If the record doesn’t need to be chased it will instead show the reasons why (the filters from the view).
Including attachments
If you add a file field to the view and a row being chased has a file uploaded to that field, it will be added to the outgoing email as an attachment.
Note if you add a file field from the view’s parent table to the view and a particular record doesn’t have a file uploaded, the chaser will request the recipient uploads one, when completing the form. In other words it will request a document.
Multiple attachments
Sometimes there may be a set of files you wish to attach to a single email, where the files are all stored in a child table. To accomplish this, join down to the child table and add the file field in that child table to the view.
Then, when there are multiple child records, each containing a file, those files will all be added to the outgoing email.
Don’t worry that the view then contains multiple rows per email. The chaser is clever enough to only send one email, but merge in all the files from the multiple rows.
Customising with a logo
When the recipient receives the chaser email, they can click on a link to fill in a form and supply the requested information.
That form can be customised by adding a logo at the top. To do that, a file field named Logo must be added to the chaser view.
If the same logo is to be used for all messages, the simplest way of accomplishing this is to put the Logo file field in a table with only a single record in it. Then add a cross join from the chaser to that table, to allow you to add the Logo field to the view.
Receiving a response
When a response is received to a chaser, as well as saving the documents / fields the chaser asked for, a comment will be logged to the first comment field in the parent table (if there is a comment field).
An email will also be sent to a user notifying them of the response. The logic for who to send that notification to is:
- If there are any dropdown fields in the table with the option fill with users then send the email to the user selected in that field. If there’s more than one field with that option, use the first one.
- If there are no fields with ‘fill with users’ selected, fall back to notifying the user who last updated or created the record being chased.
Sending thank you emails
When someone completes the chaser form and provides the information requested, a thank you page will be shown. If the value of the send thanks calculation in the chaser form is true for a row, then the recipient will be sent a thank you email as well.
Optional response fields
The following fields can optionally be added to the table. If they are found, they will be populated by the chaser system when a chaser response is received.
- chaser response received: if a date field with this name exists, the value will be set to the date and time of the response
- chaser response needs checking: if a checkbox field with this name exists, it will be ticked when the response is received
Errors
If an email can’t be sent because of an invalid address in the ‘To’ field, then the address specified in the ‘Escalate To’ field will be notified.
Using multiple chasers on the same table
[TODO]
Feedback
Was this page helpful?
Glad to hear it! Please tell us how we can improve.
Sorry to hear that. Please tell us how we can improve.