Common Options
Capitalise field name
By default Agilebase displays field names in Title Case. Un-ticking this option disables that, which can be useful for special cases like e.g. ‘pH’ or ‘Length (m)’, which would otherwise show as ‘PH’ and ‘Length (M)’.
Icon
Rather than displaying a field name, show an icon, chosen from https://fontawesome.com/icons. For example, to show a phone icon for a phone number field, you could enter fa-phone, for an email field fa-envelope or a twitter handle fa-twitter.
Field visibility
Allow a field to be hidden or shown based on conditions.
You can either select a view containing the conditions to use or just create conditions directly under the Field Visibility heading. In either case, the conditions in use will be shown.
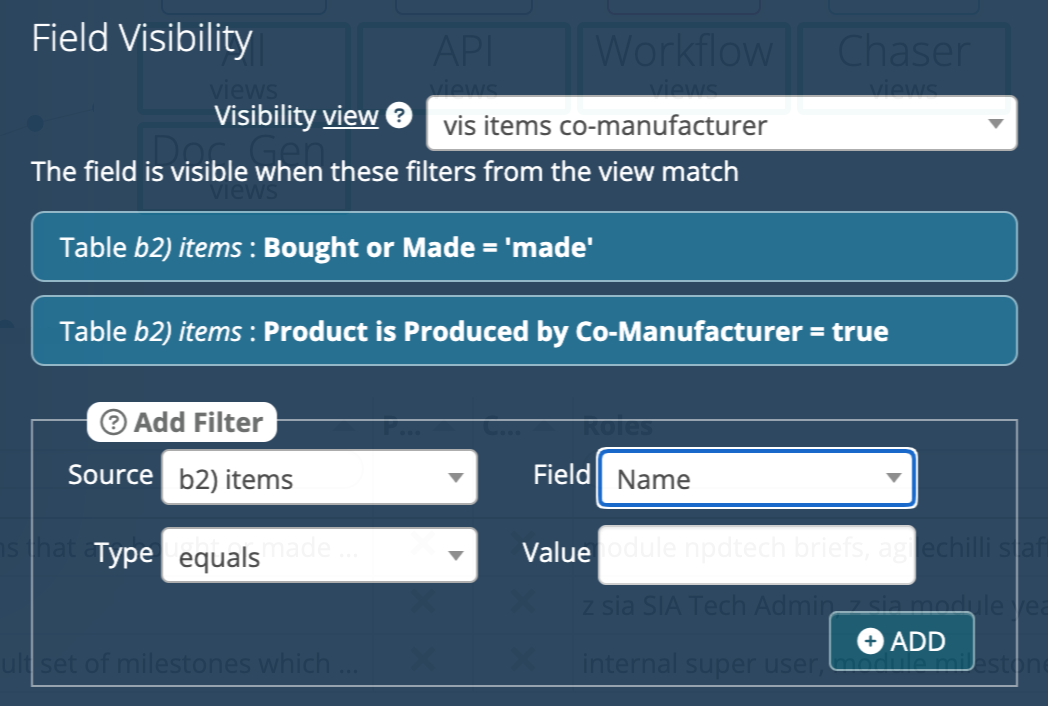
Behind the scenes, the conditions are saved by creating a view (if none is selected already) and adding each condition as a filter. If a record appears in the view, the field will be visible, otherwise it won’t display to users.
You can click the ‘visibility view’ link to go to that view and edit it to add more complex conditions if you wish.
As the conditions are created in a view, this mechanism is really powerful. You can create simple or very complex critera, including all of the filter options in a view, for example basing a filter on a calculation and combining multiple filters.
So you could make a field appear only when a particular point is reached in a process, or a status is changed elsewhere in a form, or perhaps it should only be visible to people who are members of a certain role. See view filters for more information.
Two special options are available
- show always - the default state
- show never - useful for hiding fields used for internal purposes, e.g. which help the internal workings of a workflow
If this option is used on a separator field, then the visibility rule will apply to the entire block of fields under that separator.
Lock when value set
If the field is blank, allow a value to be entered, however as soon as it has a value, lock to prevent further editing. The user can manually unlock, but will be prompted for a reason for doing so, which will be logged against the field as a comment.
This can be used to prevent accidental editing of important fields which should not usually be changed, for example a product’s stock code.
Unlock if record in view
If Lock when value set is ticked, unlock on certain criteria. Works the same way as Show if record in view.
Required
If ticked, prompt the user for a value when they try to leave a record without one. Note we can’t force the value, as the user could refresh the browser as a workaround.
For dropdown fields with the value(s) set to Lists of users, this has the special effect of defaulting the field to the ID of the currently logged in user.
Prominent
Prominently highlight the field on the screen, e.g. if it’s one that is important to fill out, without actually requiring a value to be supplied.
Set from previous referenced field
Provides a way to calculate a default option for a field. Tick this option and place a referenced field just before this field. The value of this field will be set from whatever value the referenced field outputs.
If the referenced field’s view has more than one field, the last one will be used, or if any have the same name as this field then that one will be.
To have a value set only at a certain point in a process, this option can be combined with the Show if record in view option. When the field becomes visible, the value will be set.
Setting the value of a relation field is a special case because you need to set both the actual relation value, which is the numeric ID of the record you wish to relate to, and the display value i.e. what the user should see. The way to do this is:
- Add a field or calculation with the same name as the display field for the relation. For example in a contact record, if you have a relation field ‘Company’ with its display field set to ‘Company Name’, then you could create a calculation called Company Name and set it to output the name of the relevant company.
- Add the internal row ID for the company to the referenced field’s view. This should be the last field in the view
Note that another way of setting a value on record creation is to use a workflow set to run on record creation. If you need to set the value on record creation, using a workflow is the best way - it will seem slightly quicker to the user. However if you need to be able to wait a while before automatically setting the value of a field, perhaps until another field has been filled in, then using this referenced field option is the way to go.
Unique
Disallow any duplicate values from being entered. No records in the table can have the same value as each other.
Change causes record refresh
Through the use of some field options like Show if record in view above, the screen can change based on what’s entered into a form. This option can work as a switch to refresh the configuration of the screen if it does change as someone enters new data.
For example, if there is a table to store sales opportunities, one field may be the status. If the status changes to
wonorlost, then you may wish to show some extra fields like ‘date won’ or ‘reason why lost’ for example. To allow this, tick the ‘change causes record refresh’ option on the status field. Then whenever the status changes, these fields will automatically appear if relevant.
Feedback
Was this page helpful?
Glad to hear it! Please tell us how we can improve.
Sorry to hear that. Please tell us how we can improve.