PUSH API worked example - Zapier
One of the most common methods of pushing data into other systems is to use Zapier, which is a ‘drag and drop’ integration tool that requires no programming (just like Agilebase itself).
We will use a worked example: building a system to send a ‘hello’ SMS message whenever a new contact is added to our database. In real life, you may send appointment reminders or other notifications by text. Of course Zapier integrations aren’t limited to sending text messages, there are tons of third party systems you can use, under many different categories, but text messages are a nice simple example to work through.
For this example we’ll use
- Agilebase as a source of data
- Zapier to collect the data and send it to…
- Twilio to send the text messages
Agilebase setup
First, some preparatory work in Agilebase. Assuming we already have a contacts database, each person with a name and mobile phone number, there’s just one extra thing we need to do.
The system will need to know when a contact has been sent a text, so it can filter them out and prevent them being repeatedly texted. To allow this, we need to add a field, call it intro text sent. Make it a date and time field, accurate to the second.

We can set it to ‘show never’, as this information’s unlikely to be useful to the average user.
Next, we create a view to provide the data to send to the text messaging service. Here’s such a view. It’s very simple, containing just the info necessary, i.e. a message calculation and the mobile phone number to send it to. We’ve put it in a tile called ‘System – Integration’. It’s a good idea to put views used for system purposes somewhere like this so they’ll be hidden from everyday users, but administrators can still easily find them.

We’ve added a couple of [filters]((/docs/views/filters/), firstly to make sure we only pick up people who have a phone number entered and secondly to filter out any who’ve already been sent the message (using the Intro Text Sent field we created above). You’ll notice for initial testing only, I’ve added a third filter here so only one contact is listed - myself. When we’ve confirmed the system works as expected, this filter can be removed.
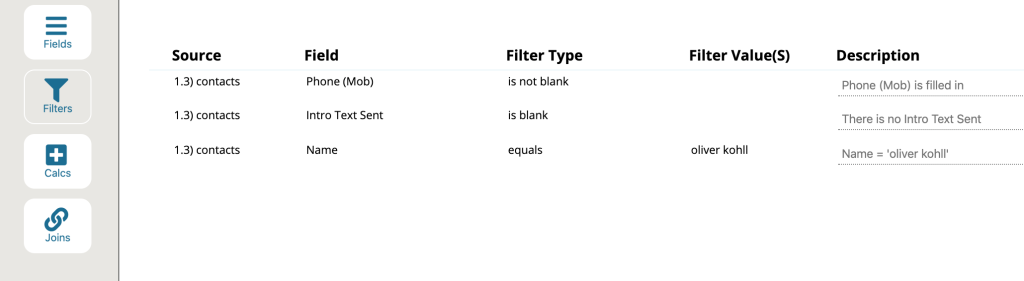
One small note to do with this specific example only – Twilio likes to receive phone numbers in international format but without the leading +, i.e. rather than “07891 123456”, use “447891123456”. In real life we’d probably create a calculation field to format them this way, for now we’ll just make sure to enter test numbers like that.
Zapier Setup - receiving data from Agilebase
That’s the Agilebase side of things prepared, now to Zapier.
Log into your Zapier account and press the Make a Zap! button.
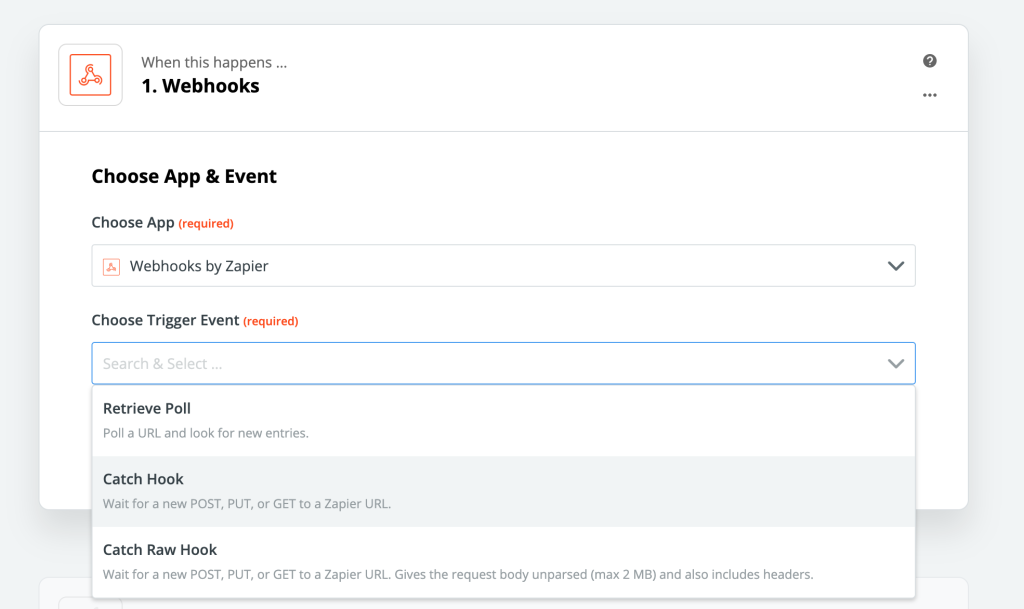
Under choose app, select Webhooks by Zapier. Webhooks are the way to communicate with Agilebase. At the time of writing you’ll need a paid Zapier account to use them.
Under choose trigger event two options will be shown - Retrieve Poll and Catch Hook. In brief, if you select Retrieve Poll, Zapier will regularly poll Agilebase (say every 5 minutes) to check if there’s any new data to retrieve. If you select Catch Hook, communication will instead be started by Agilebase, which will ‘push’ data to Zapier only when there is something new to send.
Here, we’ll use Catch Hook, which is generally recommended. It’s more efficient and a bit easier to set up, as Agilebase will automatically record the time each record is sent to Zapier. Otherwise, you’ll have to set up additional steps in Zapier to send this information back.
When you press Continue, Zapier will provide you with a custom URL and some additional options which can be left unchanged. Copy this URL and record it in Agilebase: edit the view and open the Use API panel. Paste the Zapier URL into the Push URL space provided:
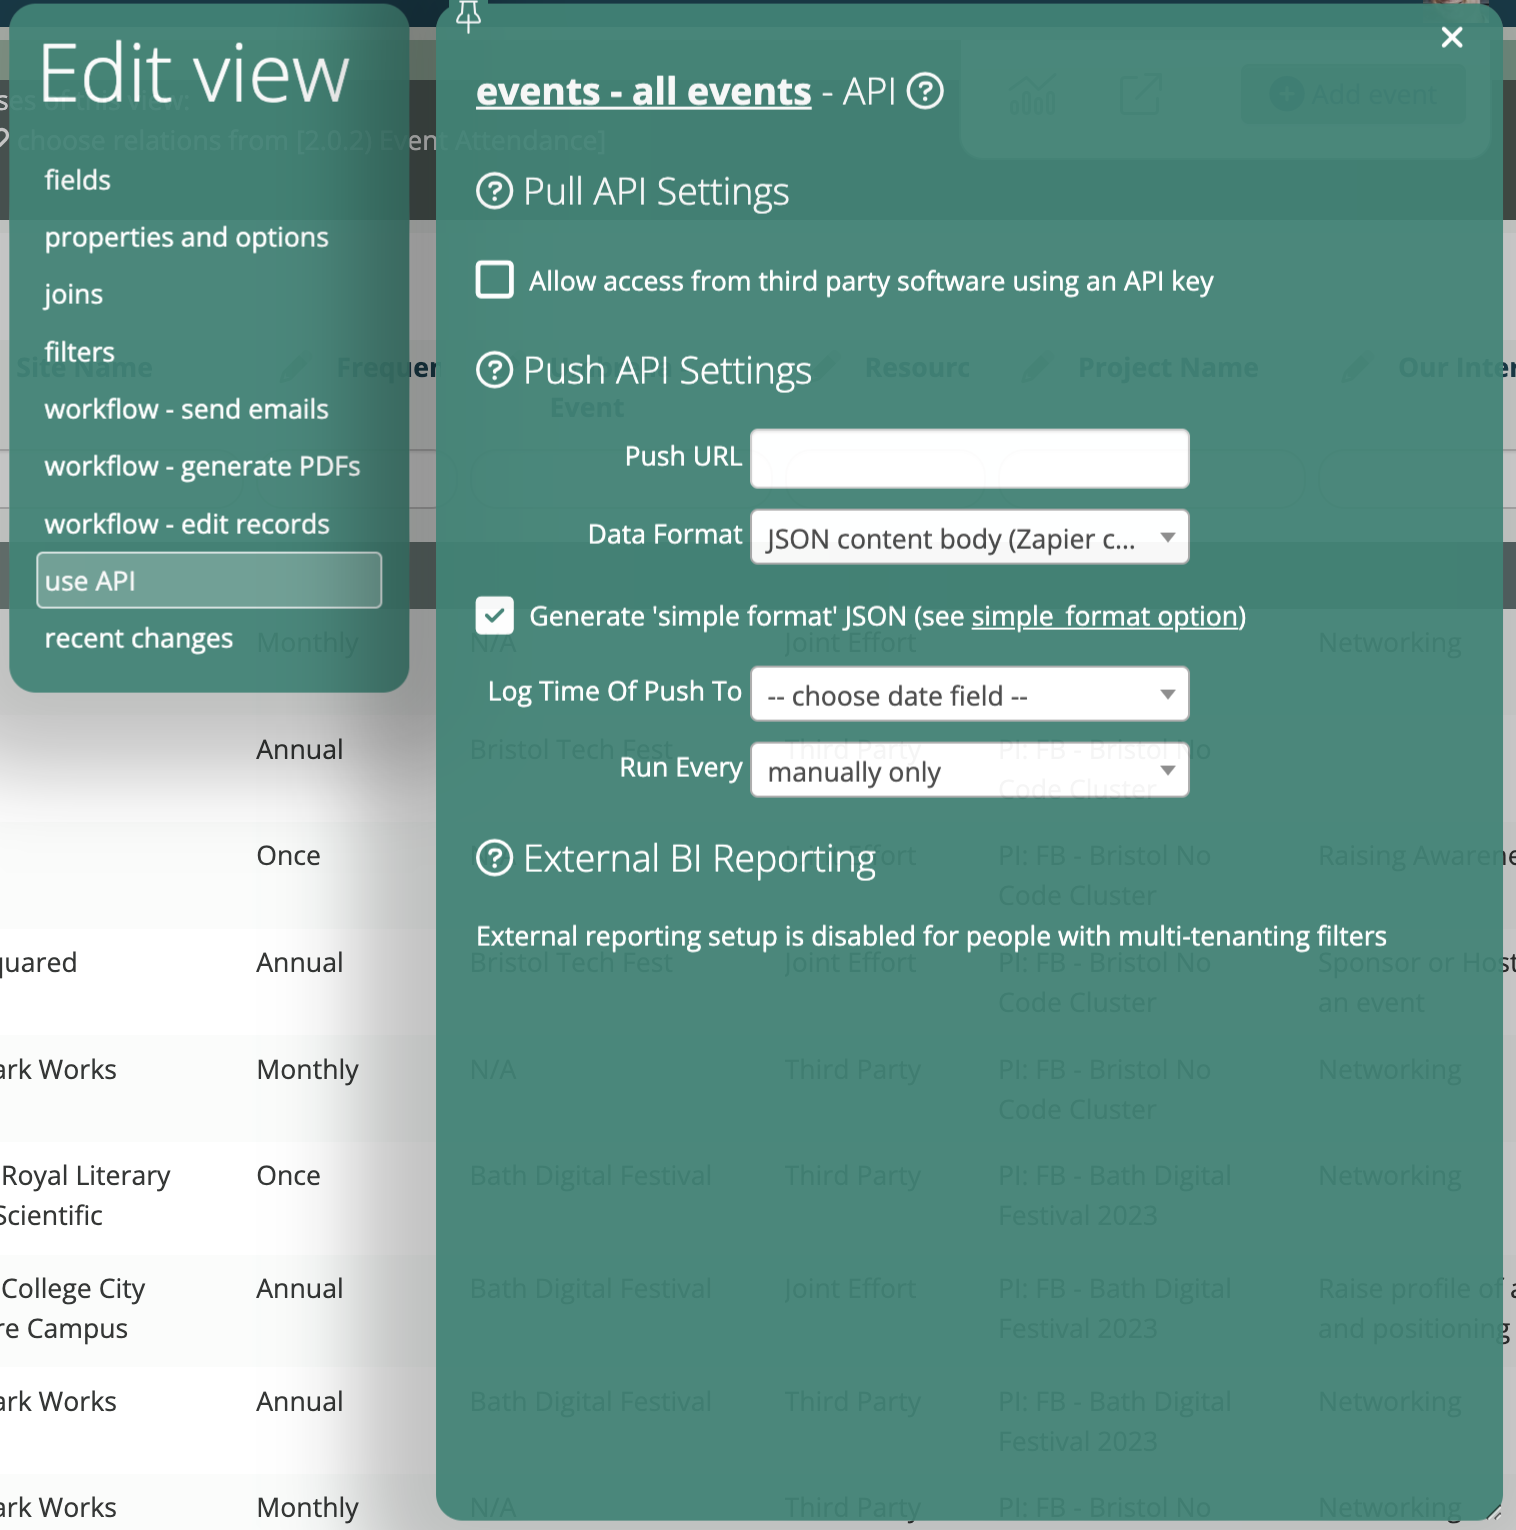
Secondly, select the date & time field ‘Intro Text Sent’ (created above) in the dropdown. That means whenever a record is sent to Zapier, the timestamp will be recorded in that field. All other settings can be left on their defaults.
Finally, press the Run Workflow Now button to send a test record to Zapier.
Back in Zapier, just press Test and Continue.
Finishing Zapier setup
Zapier now has our data, at least a test record. The next step is to set up actually sending the text message.
There are dozens of Zapier-compatible services that can send text messages. We use Twilio but the process is similar whatever you choose. In fact the process is similar whatever you’re doing with the data, be that sending a text, sending the data to a Google Spreadsheet or Mailchimp, to name just three examples.
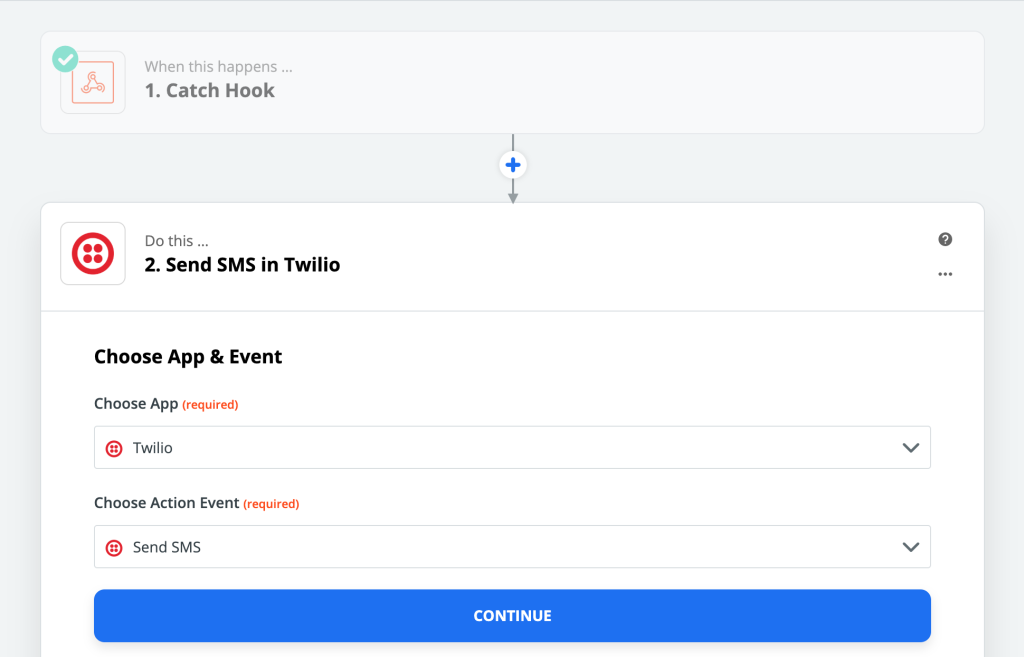
When you press Continue, you’ll be asked to sign into Twilio (in this example). Do that as prompted, then you’ll be able to set the options below. The important ones are
- From Number: just select, this will automatically show any phone numbers you’ve set up in Twilio
- To Number: here, click the selector on the right and select the phone number field from Agilebase. By this stage, Zapier, knows which fields are in Agilebase
- Message: similarly, click the selctor and choose the message field from Agilebase
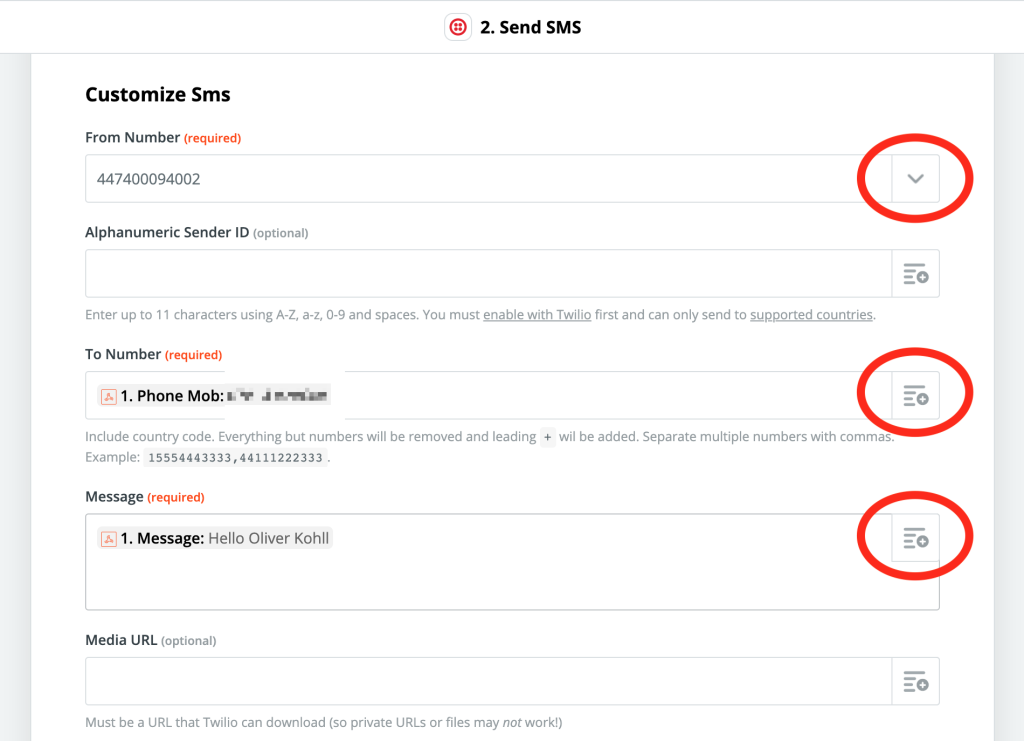
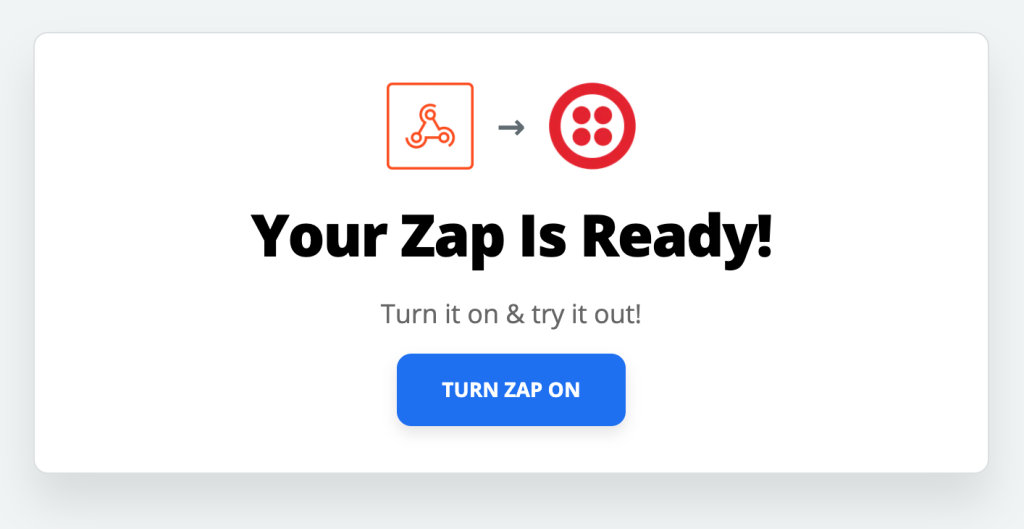
Press Test and Continue. If all goes well, a text message will be sent and you’ll get the option to turn the integration on permanently!
Then, you can remove the test filters from the view in Agilebase and everything will be live.
Although today we used the example of sending a text message, the process is very similar whichever service you decide to connect to with Zapier - you should be able to follow along the example replacing the SMS-specific steps with your own.
Good luck and please let us know what cool things you do with your data. Also if anything can be improved in this walkthrough, we’d be very keen to hear about that too.
Feedback
Was this page helpful?
Glad to hear it! Please tell us how we can improve.
Sorry to hear that. Please tell us how we can improve.