2FA setup
Setting up two factor authentication - a guide for all users
You can add a new user from scratch, or clone an existing one. To add:
To clone:
If a cost is to be applied, this will be shown to you.
You should now see an editing screen with the details of the user you just created.
![Add user][/add-user.png]
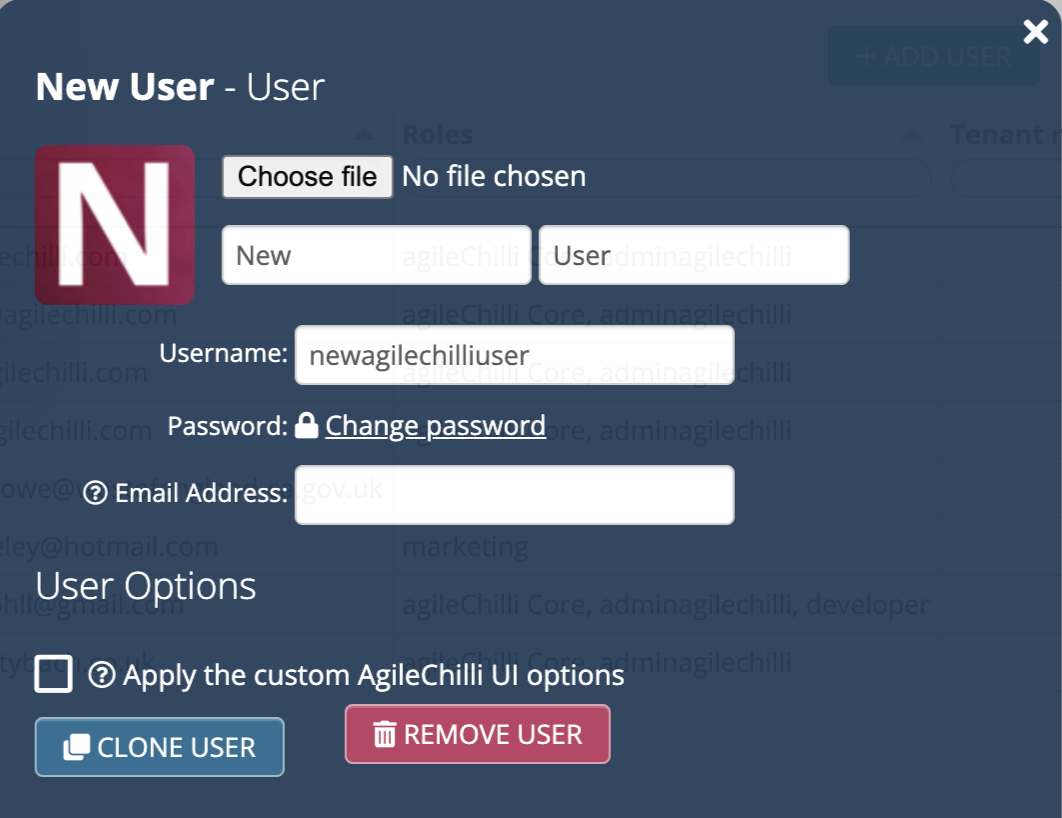
You can enter the user’s name and username. If the username isn’t their email address, enter their email address in the field provided too. This is useful
The recommended way to set passwords is for the user to choose their own, which they can do once they have a username and email address filled in. They will need to visit the login page, click the ‘reset password’ link and type in their username. They will be emailed a link which will let them set a password.
As an administrator, you can also manually reset someone’s password by clicking ‘change password’ in their user details screen.
We strongly recommend the adoption of a password wallet service like 1Password, Bitwarden or built-in browser features to generate and store passwords. That lets passwords become much more secure and harder to guess whilst not requiring users to remember them.
Passwords must be a minimum of 8 characters.
When someone sets or changes their password, it’s checked against https://haveibeenpwned.com/Passwords to ensure it’s not a common one and is suitable for ongoing use.
Passwords are stored in our system salted and hashed using the bcrypt scheme, with 13 rounds. This means that we do not know what your passwords are and in the unfortunate event of our passwords database being hacked, the original passwords would still not be able to be retrieved.
Users are strongly encouraged to set up two factor authentication (2FA) using an app. Unfortunately this is one step an administrator can’t do for them, but luckily it is quick and easy to do: here’s how.
Users without 2FA will be prompted to do so in the user interface and by email.
2FA is mandatory for administrators and necessary for a user to have before develop privileges can be assigned to them. Users also need to have 2FA enabled in order to perform certain functions such as exporting to spreadsheet.
When enabled, a user will be prompted for the 2FA code as well as their password when they log in from a device or location they haven’t used in the past 30 days.
If a user encounters any problems with 2FA, e.g. they lose the device for generating their codes, you can temporarily disable 2FA on their account by going to their user details screen and un-ticking ‘use 2FA’. Of course, you need to be aware of the risks, for example double checking that a user who contacts you is really who they say they are. Once they can log in, they’ll be able to enable 2FA themselves again.
This can be done in the company settings
When created, the level defaults to being a ‘core user’, i.e. a standard user who has no special development privileges.
A software architect can change this to move any user up (or down) in learner development progress. Please see Agile Academy for more information on what abilities each level confers.
It’s possible for companies to apply their logo and custom login screen to the system. Please contact us if you’d like to set this up.
Automatically end the user’s session after this many minutes of inactivity. The user themselves can also change this setting.
Ticking the ‘disable’ option for a user ensures they won’t be able to log in.
It may be useful to use this instead of removing a user if you may want to re-instate them in the future, for example a regular contractor. All their privileges, tiles etc. will remain in place.
For security, the system will automatically disable users if they haven’t logged in for a long period of time. You can then un-tick this to enable them again if necessary.
Here, you can specify a field name, either an equals or a contains filter and a value. The button set to user ID will set the value to the user’s ID.
The purpose of this is to limit the data rows a particular user sees in a view. If a field with the name you specify appears in a view, a filter will be automatically applied so the user only sees rows which match the filter.
For example, if you set created by [auto] = Oliver Kohll (oliver@agilechilli.com), then (assuming Oliver Kohll (oliver@agilechilli.com) is their username), the user will only see records they created, as long as the ‘created by [auto]’ field appears in the view.
A similar feature exists to add filters to roles - useful when you may want to apply the same filter to multiple users. See roles
Tick a role to assign the user to it. The primary purpose of roles is to apply privileges to groups of users, see roles for more information.
There’s one special role which can be assigned. It will be marked grants administrative privileges. Assigning that role will make a user an administrator, with full permissions over the complete system. They can create/remove users, roles, tables etc., as well as assign themselves privileges on any table.
Next to each role listed is a list of tiles that will be added to their screen if that role is assigned to them. This is a convenience feature to speed up setting up their home screen. The tiles shown for a role are those which more than half of the members of that role have. Tiles can be manually added and removed by an [administrator] or the user themselves.
If any role is a filtering role, the filter applied is also displayed.
Assign individual table privileges to a user.
When dealing with larger numbers of users it’s usually more manageable if you use roles to assign privileges.
If a user has a privilege due to being a member of a role, that privilege is shown with a shaded blue background. Any additional privileges individually assigned to them are shown in green.
Allows an admin to add/remove tiles for a user. By default users can add/remove tiles themselves too, although this can be disabled through the use of a custom UI.
From the homepage, toggle development mode on and click the ‘users’ box at the top right. You’ll see a list of existing user accounts. Their details are listed including 2FA status (whether they’re using app-based 2FA or not) and when they last logged in.
Each user’s roles are shown. Any multi-tenanting roles are also included.
The list of users can be exported to spreadsheet by clicking again on the ‘users’ box at the top right of the screen.
Note that if you want to see a full audit trail of what each user has done (editing, searching, exporting etc.), then you can use the optional enhanced audit trail feature (only available on certain plans).
To remove a user, click one in the list (see above) to open the user editing panel. At the bottom, click the Remove button.
A user removal will have no effect on any data stored in the system. The user’s previous comments will still be visible for example and their username will still be logged against any records they’re marked as owner of. Their changes will still be in the audit trail and they will be marked as the creator/last editor of records where relevant.
You may want to take some other actions after deletion e.g. to re-assign records they are assigned to.
A deleted user’s profile image will be replaced with a standard icon representing a deleted user, when displayed in comment streams etc.
Setting up two factor authentication - a guide for all users
Allowing access to people outside the organisation
Helping people who have problems logging in
Was this page helpful?
Glad to hear it! Please tell us how we can improve.
Sorry to hear that. Please tell us how we can improve.