Chaining Workflows
How to chain Workflows
To set the next workflow in a chain, simply set the appropriate view in the Chain workflow section of the workflow - edit records panel when editing a view. The next workflow in the chain will run as soon as the previous finishes.

Auto-connect new records to records created in previous chained workflow steps
This option is available when using a workflow that creates new records. Say for example a workflow consists of two steps
- Create an organisation
- Create a contact belonging to that organisation (assume there’s a relation field linking contacts to organisations)
When ‘auto-connect new records’ is ticked on the workflow for step 2, the contact will automatically be linked to the organisation previously created by setting the relation field appropriately.
This mechanism works no matter how many steps there are in a workflow - any records created are remembered and can be used to set values in subsequent steps. So for example
- Create an organisation
- Create a site for the organisation, linked to it
- Create a contact linked to both site and organisation
would work too, so long as ‘auto-connect new records’ is ticked for workflow steps 2 and 3.
Workflow buttons and chained workflows
When a record is kicked off from a manual workflow button, it will only run on the single record the user has open on the screen, i.e. the record that the workflow button is in.
If the workflow has further steps chained from it, you’ll most likely want those to only run on that record too.
For example, imagine a workflow is made up of two chained steps
- generate a document e.g. an invoice
- send that document to a recipient
The workflow view may contain many records which could theoretically have a document generated for them. When the button is pressed to run step 1, it will only run on the single record on screen.
Agilebase will then pass the ID of that record through to the next workflow step to act as a filter. i.e. ‘send that document to a receipient’ will only send the individual document which has just been created.
This mechanism works until any workflow step creates a new record. When that happens, it’s unclear whether subsequent steps should run on the original record or the newly created one, so the ID won’t be passed through to following steps and you’ll have to manage things manually, e.g. using flagging as below.
This behaviour can be manually disabled by un-ticking the option Make subsequent workflow steps act on the same record as this one, which will then cause the next chained workflow to always act on all records in its view.
Using hidden “flagging” fields
It is sometimes necessary to find the source record when chaining workflows.
A trick to allow you to find the appropriate record is to use and set a flag field in the source table.
- Use an Update Workflow to set the flag to True
- Other workflows can join to this table and filter by flag=true
- Finally, remember to set the flag to false as the last step in the chain, so that it is not inadvertently included in the next run.
Visualising linked workflows
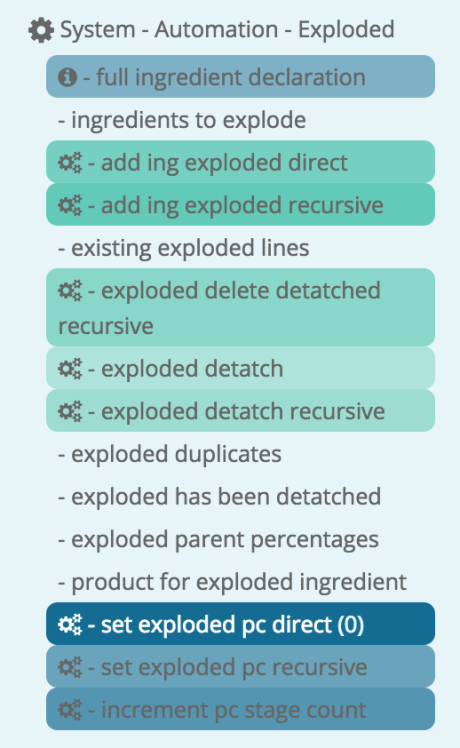
We’ve added one more thing to the system to make working with these multi-step workflows easier. When you click on a workflow step in the admin interface, it will colour all preceding steps (if any) in green, fading to lighter green the further back they go. Similarly all future chained steps are marked in blue, fading to light blue the further forward they are in the chain.
Feedback
Was this page helpful?
Glad to hear it! Please tell us how we can improve.
Sorry to hear that. Please tell us how we can improve.