Guide 3.3 - Records: Advanced UI Control
Records
The Full record view is the interface that a user uses to update and create data in the underlying source Table.
This User Interface isn’t simply every field shown on the screen. The power of agilebase comes from providing facilities to control how the user interacts with their data. Put another way, by allowing developers to control individual fields, decide when to show them and group them together etc, the job of entering data becomes a pleasant user experience.
There is plenty of help available in the agileBase Docs system - Help on Fields So, we will focus on a couple of key features that have a big impact on the user interface
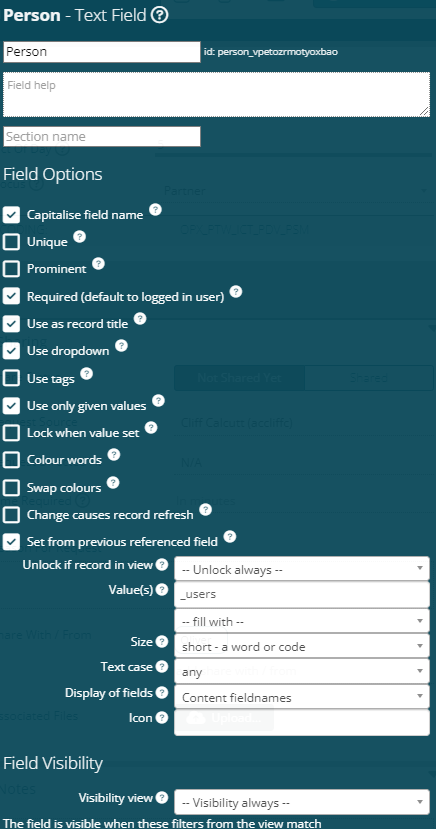
Let’s start with the simplest Field type, a text box. It actually has some of the most powerful options. This can be setup to accept “anything” - and you can choose how much text is “expected” from the user by setting small, medium or large.
Or you can decide to control/restrict the data entered…
Choosing “Use as DropDown” or “Use tags” changes the text box from free form text entry to selecting from a list. Use as dropdown restricts the user to a single option, whilst tags allows multiple choice.
Ticking “use only given values” restricts the options the user can choose from to be from the comma separated list of values.
N.b. A dropdown with 3 or less options will appear as button switches. We can use this facility to create a pleasing UI when the user is faced with a series of Choices.
It can be very useful to prefix each option with a number to help with ordering when alphabetical is insufficient. For example if we want Yes before No! Its during this scenario that being able to “Swap colours” can also be be handy
There is a further option to “load” the options with the list of Users in the system - very useful when assigning ownership e.g. Account Manager or Task Assigned to
(video coming soon)
A couple of quickies…
Date fields - you can control the date format (e.g. use the 3 letter month name not a number) as well as the accuracy required on data entry.
Number fields - a hidden option on a decimal field is the ability to use “as duration”. Make sure you have 2 decimal places of accuracy and the user will see a time or duration… so instead of seeing a value like “17.5” they will see 17:30.
(video coming soon)
Relation fields
These are the cornerstone of agileBase. Controlling and helping the user “pick” the right relation can make or break the usability of a system. It is worth spending the extra time to ensure the right “picker” is set up on a relation field. This is done by setting the “view to use” to be a tailored view dedicated to the job…
(video coming soon)
Cross Reference fields
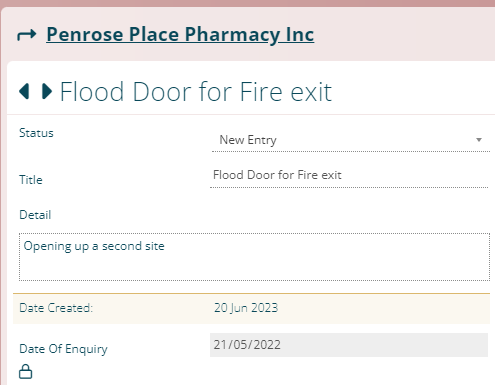
One of the most powerful features a developer can use when defining a table and its user interface is a cross referenced field. This field type isn’t for storing data directly, rather its for looking up existing data! The Cross Reference (Xref for short) is a link to a view that navigates the relational database in order to calculate or lookup relevant information for the record being looked at by the user. There are lots of use cases and lots of options when setting up the Xref in order to optimise their use. One of the simplest Use Cases is to turn an editable field in to read only. For example, displaying the date when the record was created.
To do this, start by creating a view based from the appropriate table. The name of the view is only important to the developer, but it can be useful to adopt a naming convention and filing system to help manage the back-end of the system. In this example we’ll call it “Xref - Date Created” and file it in the tile “System - Cross Referenced”.
Now, simply add a calculation, giving it an appropriate name. Bear in mind this name will most likely appear to the user so we will call it “Date Created”. The contents of the calculation will be {sales opportunities.creation time [auto]}
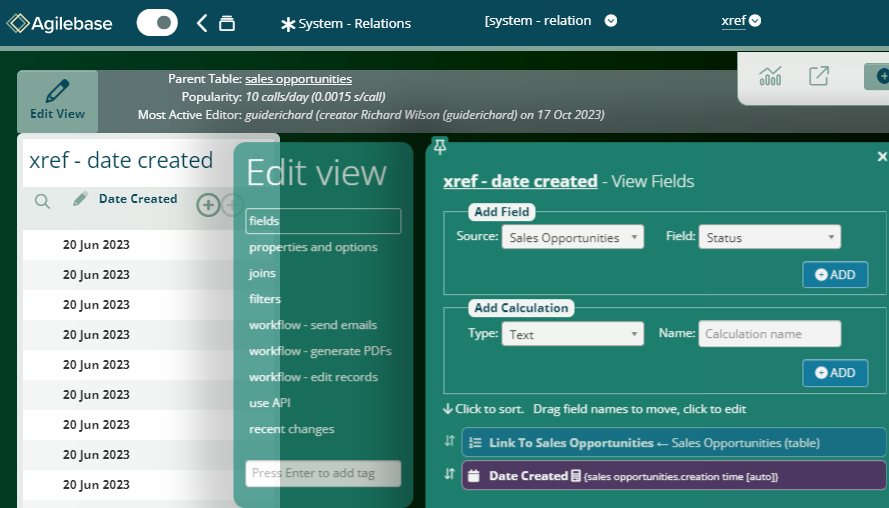
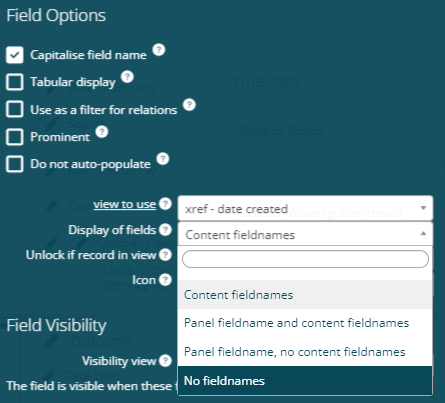
Now return to the Table and add a field of type Cross reference. Find your view and press add. After positioning it somewhere appropriate the UI should look something like…
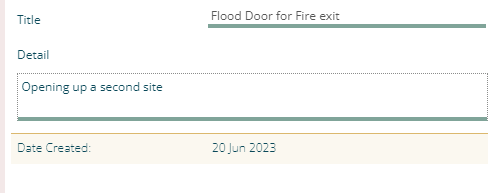
You have a couple of options about how the data appears.
The Tabular Display checkbox does what its says on the tin. It is most useful when the Xref returns multiple lines of data.
If unticked then the Display of Fields options come in to play.
Cross references can return a lot more than a single field of data… the next example returns a table of data.
In this example we will create a view from the organisation that joins DOWN to the Contacts table and pull through a few key fields of information.
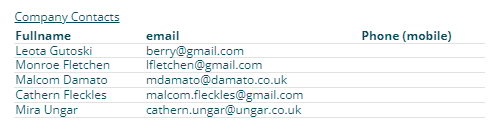
We can now see the Organisation’s contact list embedded in the Organisation record
(video coming soon)
Important Concept for building Cross References
How you start building a Cross Reference view will effect how the UI uses it. In this next example we will repeat the task but start by building our cross reference view from the contacts table and join UP to the organisation. We will pull through the same few key fields and add the cross reference to the Organisation table.
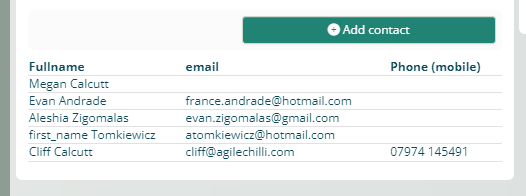
As you can see we get more than a list, in fact we can add new contacts and edit existing ones. In this configuration this Cross reference is an alternative to using the contacts tab. As the developer the choice is yours to use the mechanism which you feel is best.
For this use case it would make sense to keep the Contacts tab, and use the first style of cross reference (read only mode) but only after its been tweaked to return those contacts who are flagged as the Owner or CEO.
(video coming soon)
Xref as Workflows to create a Button
If you have read some of our other guides you’ll know that a view can be configured to be a WorkFlow and perform an action. And since a cross reference is also a view we can use this “double life” and use a cross reference WorkFlow to make a Button!
It is as simple as adding any other Cross reference… although the name of the view you add will become the button title! So again, with a little bit of housekeeping it can be useful to have a tile called “System - Buttons” to keep them all in.
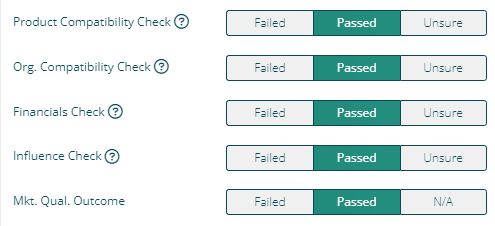
A typical Use Case would be to use a series of buttons to move a record through a series of “states”. This is especially useful if only certain users are allowed to change the state at certain stages. For example: a Non Conformance may be marked as “Completed” by anyone, but only “admins” are allowed to mark it as “Verification Complete”. The right combination of buttons and visibility rules will make the UX smooth and seamless.
To acheive this you will need to add a total of 3 cross reference fields. The first is a simple “data” that shows the user the current “Status”. The other 2 cross references, both Workflows, each set the “hidden” status to the appropriate value. The visibility rule applied to each is very important - they need to check a combination of status and user role to ensure that the button is only visible at the right time to the right people.
(video coming soon)
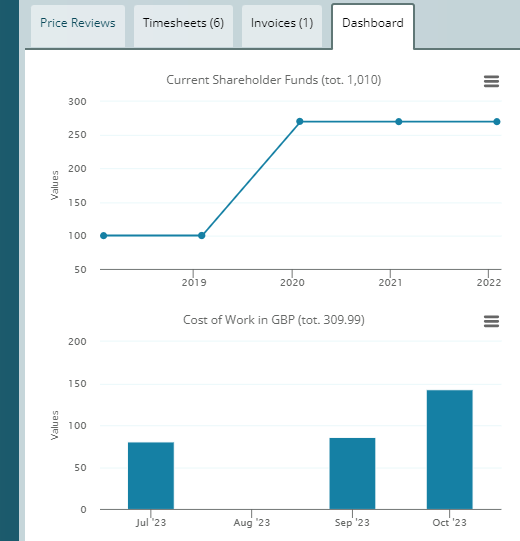
Xref to embed Graphs
The final use of cross reference fields is to embed graphs in to the User Interface. If you add a simple “data” style Cross reference, but have gone into that view as a user and added a graph, then the system will choose to display the Graph instead. Whilst the Cross reference may return a large data table (and corrsponding graph) when we look at the cross reference embed on the full record you can see the graph is only displaying results related to the record, in this case the organisation.
(video coming soon)
Controlling access to a Field
The roles and permissions system gives you top level control as to the whether the whole table is accessible to a user. However, you often need more fined grained control on field by field basis. There are two complimentary ways of controlling access to a table’s field. We have already briefly mentioned visibility rules, but there are also rules for locking. The key difference is whether you want the end user to see the data or not! In both cases you can make the decision once, choosing “always” or “never”, or a much powerful option is to use a calculation to make the decision. It is very similar to creating and using a cross reference… a view is created… in this case its a mechanism to hold the logic. The system uses the existence of the record within this “logic” view to control whether the field being looked at should be locked or is even visible.
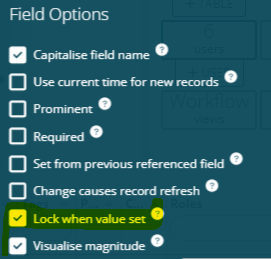
There is actually a shortcut to a regularly used “locking” use case… Often you want a field to be non-editable once filled in. In this case you dont need to write the logic an apply the view, simply tick the option on the field options screen
(video coming soon)
Form Titles
Record Title
The user interface has the ability to highlight the importance of certain fields by showing their contents in large font at the top of the record data. For example, a Company Name field may be the record title for an organisation record.
This option can be selected for multiple fields in a table. In that case, the first field will be the main title, others will appear as subtitles.
It’s also important to consider the position of the relation fields in your table.
In this first example the Organisation field is the first field in the table definition. It is given elevated status and appears as large link above the record title.
In this second example the organisation field is second in the list and the record title field is not flagged as such.

Preventing duplicates Enabling the ‘use as record title’ option also has the effect of enabling duplicate detection. The system will detect when a value is entered that is close to an existing value in the system. Any ‘close’ values that are found are displayed as links to the relevant records.
This can be useful when e.g. entering company names. Although a field can be marked unique to prevent exact duplicates, that won’t pick up near matches, which this duplicate detection will. For example, ‘The Universoty Of Bristol’ and ‘University Of Bristol (UOB)’ will be detected as close matches, or ‘Agilebase’ and ‘Agilebase Ltd’.
The system uses trigram matching to detect similar values.
Sections
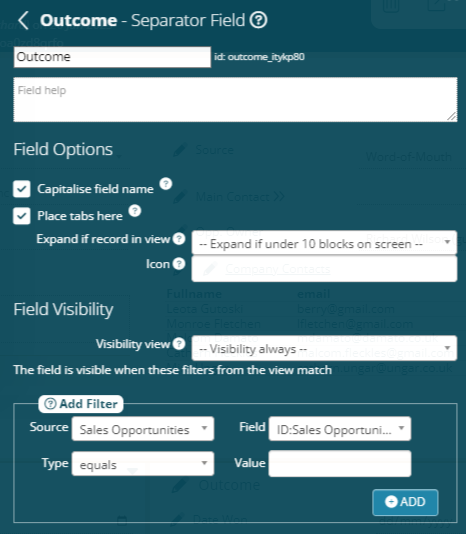
A separator field doesn’t actually store any data, but is used as a marker of the start of a block of fields. Create a separator and move it to just before the field which should be the first in a block. Depending on the table layout, these blocks will be displayed in different ways, but in all cases will form a distinct group of fields.
Not only is the separator a useful mechanism for breaking up complicated forms of data, but it acts as a container allowing you to control visibility of the whole block. Simply apply your visibility rule to the container and all fields within it are controlled too. Some use cases require optional data to be captured… in these instances it can be useful to have sections that are closed by default. You can use a “logic” rule to make them open once a user has decided to enter data in to them.
Another setting with the Separator is “has tabs”. This simple tickbox probably has the biggest effect on the user interface…
The last Separator to have this option “ticked” will be the first “block” contained under the first record tab.
Form layout For more information on layout options visit
(video coming soon)
Feedback
Was this page helpful?
Glad to hear it! Please tell us how we can improve.
Sorry to hear that. Please tell us how we can improve.