5. Cross References and Automations
Learning Aim: Using Cross Reference (Xref) fields in a table definition to display related info. Introduce WorkFlows (Buttons, sending emails, document generation). Being organised by using a naming convention!
Prerequisites: User to have watched “Add a Sales Pipeline” and “Introducing calculated” video. Understand how to create calculations in views.
Introduction
This part of the guide starts to introduce some more powerful and advanced features of the agileBase system. It looks at how we can give users of our basic CRM some power ups that make it a better user experience. Let’s continue with our Sales Opportunities and introduce the concept of cross referencing data before adding an automated email ‘reminder’ and a button to the user interface…
[guide 1.5 - video 1]
Getting things ready
As a system starts to get bigger it helps to organise the “behind the scenes” views as much as the tiles and views that out users interact with. It is good practice to create a collection of System Tiles where you can file the “behind the scenes” work.
We would suggest the following tiles:
- “System - Cross Reference” for the lookup style views that will add data to our forms
- “System - Workflow” for the automations
- “System - Visibility” for the rules that control the visibility of specific User Interface items
- “System - Tabs” for the views that control the list of child items seen on a forms tab
- “System - General” for everything else
Adding Look Up data to a Form
In this first example we want to show the user who the owner of the company is rather than letting the user set it.
Start from the Tiles interface, and enter the build interface.
We first need to build a view that will look up the data for us.
Find the Sales Opportunity table, click to Edit, navigate to Names and Views, and Create a new view (with out all fields) in the Tile called ‘System - Cross Referenced’… Try using the name “xref - Sales Opportunity Organisation Owner”
To find out who the company owner is we need to navigate the relational database. In this case, UP to the organisation, then DOWN to contacts.
Add the joins!!!
Typically, Cross reference views only have a few key fields of information…
Add Name, tel and email
However, we only want contacts that we know are the Owners, so add a filter on the contact role where Role contains “Owner”
At this point it’s useful to look at the data and judge whether it seems about right
Now we need to add this data to the Sales Opportunity.
Go back and Edit the Sales Opportunity table and show the list of fields.
Add a Cross reference field. This is just a special type of field that needs a little bit more setting up than a regular field.
Add the new field, name “Company Owner(s)”, set the type to ‘cross referenced data’
Table to Use: Sales Opportunities
View to use: ‘xref - Sales Opportunity Organisation Owner’
Move it to right place (probably near the top)
Close the edit, navigate to a Sales opportunity record and see how it looks
You have a little bit of control how it appears on the form, by choosing ‘Tabular display’ and or the drop down ‘display of fields’
Automations - sending an email
Our second example is going to demonstrate the power of Workflows. We can configure the system to be working when we’re not! We will now add an internal ‘Reminder’ email that will prompt the owner of our Sales opportunities to update their progress. You can read about this facility at docs workflows - sending an email
IMPORTANT NOTE - Whilst Agilebase can be used to send emails, it should NOT be used for marketing purposes. Rather it should be used as a method to notify people about data associated to the system. In this instance we are going to remind people that they have ‘Sales opportunities requiring updates’
[guide 1.5 - video 2]
1. Starting from the view of Tiles, enter the build interface.
We first need to create the Workflow that will do all the work for us.
Find the Sales Opportunity table, click to Edit, navigate to Names and Views, and Create a new view (without all fields) in the Tile called ‘System - Workflows’. We suggest a name like “WF email - Sales opportunities requiring updates”
Prefixing with WF, along with some text, makes it clear to future developers what action the Workflow performs.
2. Our intial task is to add all the fields we wish to use in the email
Add the join to get the Main contact’s full name
Add Title, Date of Enquiry, Main Contact, Owner, Last updated
3. Now Add the filters so we only get the records that need chasing.
Obviously we only want to chase Opportunities that have not been updated recently
Add a filter for Last Updated that is older than 1 week
We also only want to chase Opportunities that are ‘In Progress’. Our Status field uses a number prefix to make this easy… Opportunities that still need to be progressed have a prefix number lower than 4, therefore add a second filter for Status Less Than 4
4. Setup the email
Click on the “Workflow - send emails” option on the Left hand Side of the Edit pop-up.
We are sending an internal ‘email notification’, so click the right hand option
Set the options much like you would a mailmerge in Word. In agileBase you use the Curly brackets to let the system know where to insert the data (notice the list of fields available to you above the To input field.
For example we want the “To” field to be set to {owner}
Subject can be set to ‘Sales Opp Update needed for {title}‘
And the Body of the email can be set to
‘Hi {owner}
You have a Sales opportunity called - {Title} from {Date of Enquiry} that has not been updated since {Last updated}. Please contact {full name} and do what a good salesperson does and close the deal!!!
Regards
Agilebase’
The system will colour the text red if you get any of the merge fields incorrect
5. Setting up the workflow
Set the Workflow to run everyday
Set the Log send time and choose every 24 hours. Once set to 24hours you can specify a time the workflow should run. Dont forget to log when it sends to a new field called ‘wf_SalesOpDateChaseSent’
Behind the scenes agileBase has automatically added a filter that means this Workflow will only ever chase once. Whilst this is probably the case in 90% of cases when we chase things by email, in this example we want to chase every 7 days. So we can alter the Filter.
Navigate to the filters option
Remove the automatically created filter on ‘wf_SalesOpDateChaseSent’.
Now, add one back in with ‘wf_SalesOpDateChaseSent’ must be older than a week, and then click the ‘or blank’.
Finally, if you click on the view title, the display will load in the list of records that the system will email next time the Workflow runs - which should be tomorrow at your specified time.
TIPS Go to ‘Properties and options’, and set the ‘Row limit’ to 1
You’ll see the view only has one item in it.
If we now go to ‘workflow - edit records’, we can press ‘Run Workflow Now’, and it will only send the one email!
We can also see evidence of the email being sent in the Logs, recent messages section.
Now don’t forget to go back and remove the Row limit!”
A look at the “Chaser”
The email notification option usually sends a single email per record. The Chaser is a built in feature that is preconfigured to send repeat emails. This is a bigger, more feature rich version of what we just setup. Again, it’s something that runs in the background.
It’s specifically aimed at automating those emails you send to 3rd parties chasing for specific information. But can also be used for internal chasers… which is what we are going to demonstrate with a chaser for Outstanding Tasks”
[guide 1.5 - video 2a]
Setting Up a chaser
Go in to development mode and find the Tasks table.
As we’ve done before add a new view to the workflow tile and call it ‘wf chaser - outstanding tasks’.
Go to the send emails option and choose the chaser option.
Click the first tickbox and enable the chaser.
The system does a lot of the heavy lifting for you, adding fields, and creating the calcs and views needed for it to work, but dont forget to check what time of day you wish the chaser to run.
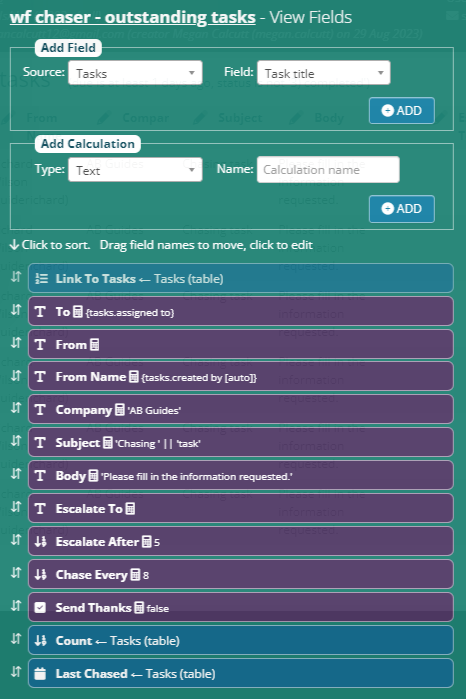
You can see in the screeshot above how the system has created several calculations setting things like ‘Chase every’ and ‘escalate after’ and ‘escalate to’ which the system references to control the way the chaser works.
For more information please visit docs sending a chaser
At a bare minimum you will need to change who we are sending the email to.
Edit the “To” calculation and change it to be the “assigned to” user.
And add the appropriate filters which in this case are when the “Due” date has passed (older than 1 day). And the status is not equal to completed.
Sepping back and looking at the data returned by the view we can see in its current form the chaser will send an email every 8 days, and after 5 attempts will stop but as we have NOT set the escalate to field no one will be notified that this task has failed to be completed!!!
Adding a button to a form
In this third example we want to add a button to the user interface so that when the Sales Opportunity is won, we want that button to set the status AND log who did it AND when!
Start from the Tiles interface, and enter the build interface.
We first need to build a Workflow that will do the actual work of setting the data for us.
Find the Sales Opportunity table, click to Edit, navigate to Names and Views, and Create a new view (without all fields) in the Tile called ‘System - Workflows’. We suggest a name like “Sales opportunity WON”
N.b. We have NOT prefixed this workflow and the name of the view will be what the user sees on the form’s interface
[guide 1.5 - video 3]
1. Setting DATA
For our workflow to set data we need to create a calculation.
We learnt how to create calculations in a previous video
In this case we want a ‘text’ calculation.
It is essential that we use the same name as the field we wish to set. In this case ‘Status’.
The correct way to write SQL for Text fields involves using single quotes to hold our value. It is also important that we set the field to be the right option in our Status drop down - in this case it must include the number prefix. Set the calculation value to be…
‘4) Won’
We also want to set WHO closed the Sales Op. This is another text field but this time the destination field is called ‘closed by’.”
We can use a special bit of SQL called a variable to find out who is logged in.
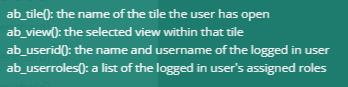
From the list above we can see we need our calculation text to be
ab_userid()
3. Setting up the WORKFLOW
Finally we need to turn this view into a Workflow that does something!
If we choose the workflow - edit records section we can change the Action to ‘Update the Matching Sales Opportunity’
We can use the fact that the system needs to store the date it perfomed the action by setting “log update to” to the exisitng “Closed date” field
We will leave Frequency as ‘Manual’ as we want the user to use a button to fire this workflow
Adding the Button to the UI
At last we are ready to add the button to the user interface
Go back to Edit Sales opportunity table and show the list of fields
Buttons are just Cross reference Fields that are setup to be workflows
Add the new field to the table… name “BTN - Sales Op WON”, type cross referenced data
Table to Use: Sales Opportunities
View to use: ‘Sales Op WON’
Move it to right place, probably near the bottom, and see how it looks
Hiding the button when we dont want it!!!
First of all try pressing the button
You can see that the status is now Won
However, at the moment, even though the button has been pressed and we’ve set the status to Won we can still press the button again!!!
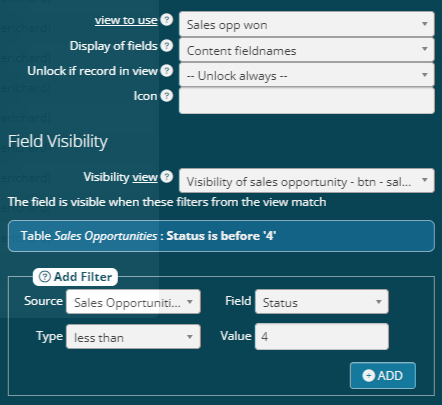
To stop this we need to apply a visibility rule to that button to hide it. In this case we want the button to be hidden if the sales opportunity is already marked as Won.
Go back to Edit Sales opportunity table, show the list of fields and click to edit the BTN field
Scroll down a little and you can see the section about Field Visibility.
Simply set the filter required - In our case this means the status value is less than 4 as seen in the screenshot above.
Other types of Automations
There are several other types of automations… we’ve already seen sending emails in this guide, but you can also create new records and generate PDFs. If you are interested please take a look at our other guides linked below and the associated documentation
List of different types of workflows
Feedback
Was this page helpful?
Glad to hear it! Please tell us how we can improve.
Sorry to hear that. Please tell us how we can improve.