6. Security and Access Control
Learning Aim: Understand basic database privileges… Roles and giving them to Users!
Prerequisites: To have built a multi table system, to have more than themselves as users.
Introduction
AgileBase uses the classic concept of Roles to help you control the access users have to the system you are building. A classic metaphor would be the manager of an office has the keys to the building, whilst the staff do not. The person acting as the manager may change overtime, but the permission and privileges (in this case having keys) does not!
[guide 1.6 - video 1]
Creating Roles
For our scenario of a Basic CRM we will model the simple situation that all users will need to access contact information, but only some users will log tasks. Similarly, only some users will access sales opportunities.
We can start by creating a Role called ‘Orgs and Contacts’
Press Add Role and name it ‘Orgs and Contacts’
Start by looking at the Privileges list. As you can see this shows you a list of ALL the tables in the system. We want users with this role to be able to read and importantly WRITE any organisation info.
Set the radio button Edit on Organisations, Sites and Contacts
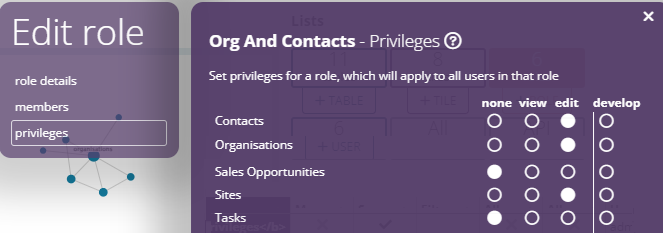 Now look at the Members option. We can give this permission to all our users.
For our Basic CRM we will need to do the same for a role to use Tasks and another for Sales Opportunites
User Roles, Permissions and Tiles
Now to take a look from a User’s perspective.
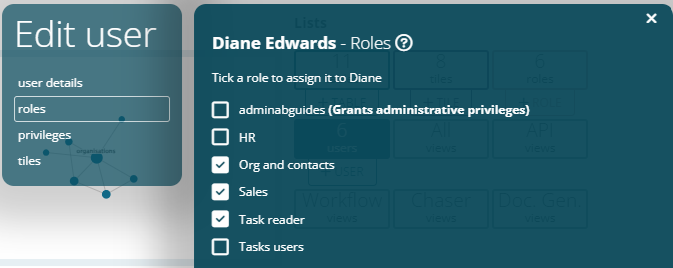
Back to the starting page of Development mode and click Users to show ALL users
Click on a user’s record
If we click on the Roles option, we can see any roles the user may be missing.
Simple click to add
 Sometimes it’s useful to see an individual’s permissions. This can be done by looking at the Privileges tab on their user record.
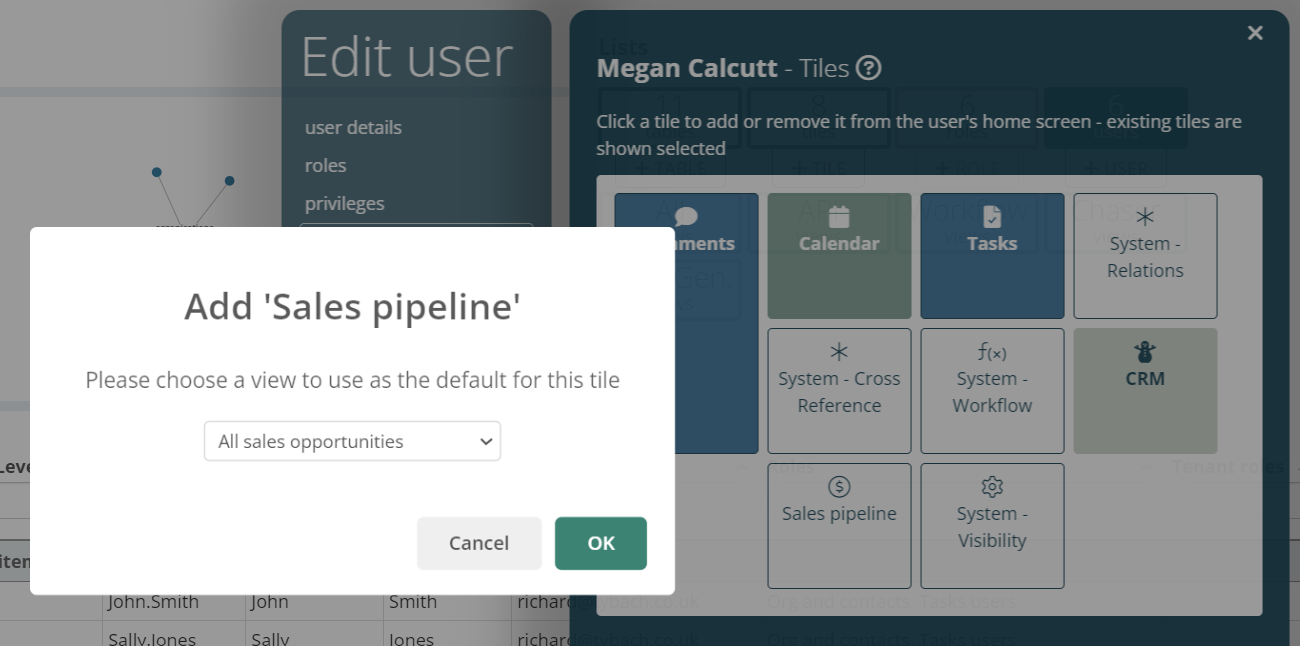
Perhaps, more useful is ensuring they have the tile to access the functionality!!!
Click on Tiles and you can see whether they have our Sales opportunity tile.
When you add a tile you are prompted to choose the default view. It is an important consideration to choose the most appropriate view for your users.
Advanced Access Control
Sometimes we may find a situation where access control can not be broken down to complete tables, but instead we want to have control on a field by field basis. In this instance we can use field visibility rules combined with the roles system. In our example scenario we have a role called “HR” and we only want ONLY users with this role to see a Date of Birth field on the Contact record.
[guide 1.6 - video 1]
We need to create a view that will control the visibility of the field, so we create a view in the “System Visibility Tile”
Field Visibility and User Roles
We have already had an exmaple of using a visibility rule to hide a button. In this case we are going a step further and controlling visibility based on the logged in User’s roles. To start we will need a view called ‘vis - Contact HR only’ built rom the Contacts table. Since Field Visibility rules work by only showing the field if the record exists in a specified view we don’t need loads of columns, we just need to concentrate on filtering. For this example we need to filter by the Role the user has, and we can do this by using a calculation. Add a Calculation field of type boolean called ‘is in HR’. The SQL you need is….
ab_userroles() ilike '%HR%'
It is easy to follow if you have an understanding of SQL, if not there is plenty of help and tutorials on the internet. However, as a brief explanation, aB_userroles() is a variable that will return the list of roles that the logged in user is a member of. Ilike is a text match that looks for in this case the letters HR. In otherwords, this query will let us know is the user is a member of the HR role. Dont forget to apply the filter by going to the fiter option and adding where “is in HR” equals True
All that’s left to do is apply the visibilty rule to the chosen field. In this example, navigate to edit the Contacts table, Click on the DOB field. Scroll down to Field Visibility, show choosing the view ‘vis - Contact HR only’
SUCCESS - A basic CRM
If you have been following along and building your own system then congratulations you have a fledging CRM system for your business. You now have knowledge of the all the building blocks needed to extend this tool and turn it into a powerful back office system to help your colleagues manage their work.
Feedback
Was this page helpful?
Glad to hear it! Please tell us how we can improve.
Sorry to hear that. Please tell us how we can improve.