1. Personalising our CRM
Learning Aim: Understand the easy ways to alter an existing view
Prerequisites: To be a competent user of agilebase, with Citizen Developer level 1 (or higher) enabled
Introduction
The guide is going to introduce to you some of the features that become available to you once you’ve been given the role of Citizen Developer. In essence, you now have the power to make small tweaks to the system that just affect yourself, helping you customise how it works and hopefully making it a more efficient and enjoyable process. A good example would be making your own view of a list of organisations that is focused on the ones where you are the owner
[guide 2 - video 1]
Introducing Developer Mode
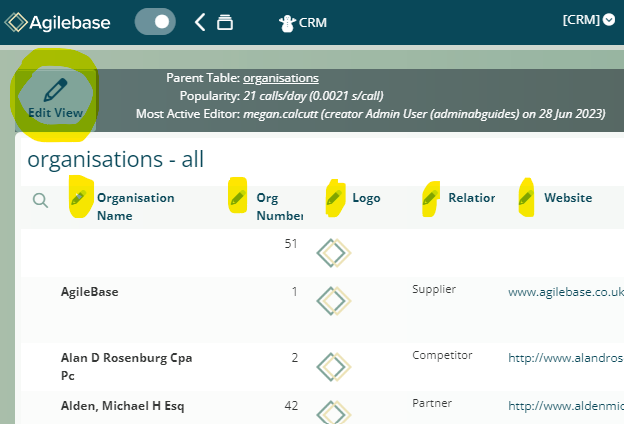
Navigate to the view you wish to personalise
Then simply toggle the development mode icon that you’ll find top left of the page.
You can see some new icons on the user interface.
Adding a field
Look at the far right of the table headers, there should now be a plus button. If this is the first time you’ve tried to change the view then the system will tell you that it needs to make a copy just for you. Simply press the button to do this. The view will reload on screen and we can see the change in name indicating that it’s your version. You can now press the Plus button again… From this window you can add other fields that may be of interest. For example me, the date the record was created. This has the rather cumbersome name “Creation Time [Auto]”. Select it and press ‘Add’. You are prompted to change the name or simply press Add to keep the original.
Moving Fields
You change the order of the fields from the list of fields found under the Edit button. Pressing ‘Edit view’ at the top left to enter development mode. You should now see the list of all the fields and its as simple as dragging and dropping the fields in to the desired order.
Removing a Field
To remove a field, you can either:
- click the small “X” icon on the right hand side of the list of fields.
- edit the individual field and press the “Remore from view button Please be aware that some fields can NOT be removed. Don’t worry, you can’t cause any damage. The system simply alerts you that it can’t delete the field. In these cases you may want to simply move the field to the bottom of the list out of the way!
Adding a filter
A useful filter to add in this example would be to only show Organisations that belong to myself. Make sure you are in developer mode, oand start by clicking ‘Edit view’ at the top left Now click on the filters section. To add the filter choose the field you wish to filter by, in this case ‘Owner’. The type of filter depends on the situation, but in this case we’ll choose ‘contains’ And the value we need to enter is your name Then we simply press ‘Add’
Renaming a view
Again, make sure you are in developer mode, and start by clicking ‘Edit view’ at the top left Now click on “Properties and Options” Simply enter your new title in the “view name” input box. TIP You can use a " - " to help organise how the views are diaplyed in the menu. So it may make sense to rename this view to “Organisations - MY”, to have our view appear in the existing Organisations menu item.
Changing the Default View of a tile
Rather than having to swap to “my” view everytime I click in to the tile, it wuld be more efficient if changed the default to be My personal view. On the front screen, click your avatar and choose tile settings. Each of the tiles will now have a cog on it. On the CRM tile we can click it and change our default view to be my personalised one. From now on, when you click on the CRM tile it goes straight to the most useful view!
Feedback
Was this page helpful?
Glad to hear it! Please tell us how we can improve.
Sorry to hear that. Please tell us how we can improve.